
Building intelligent applications today is not just about UI; the real challenge is in the backend.
If you try to build a system that understands both text and images, you quickly face multiple problems: setting up a vector database, handling file storage, managing embeddings, integrating AI models, and deploying scalable backend logic. Each part requires a different tool, making the system complex and difficult to manage.
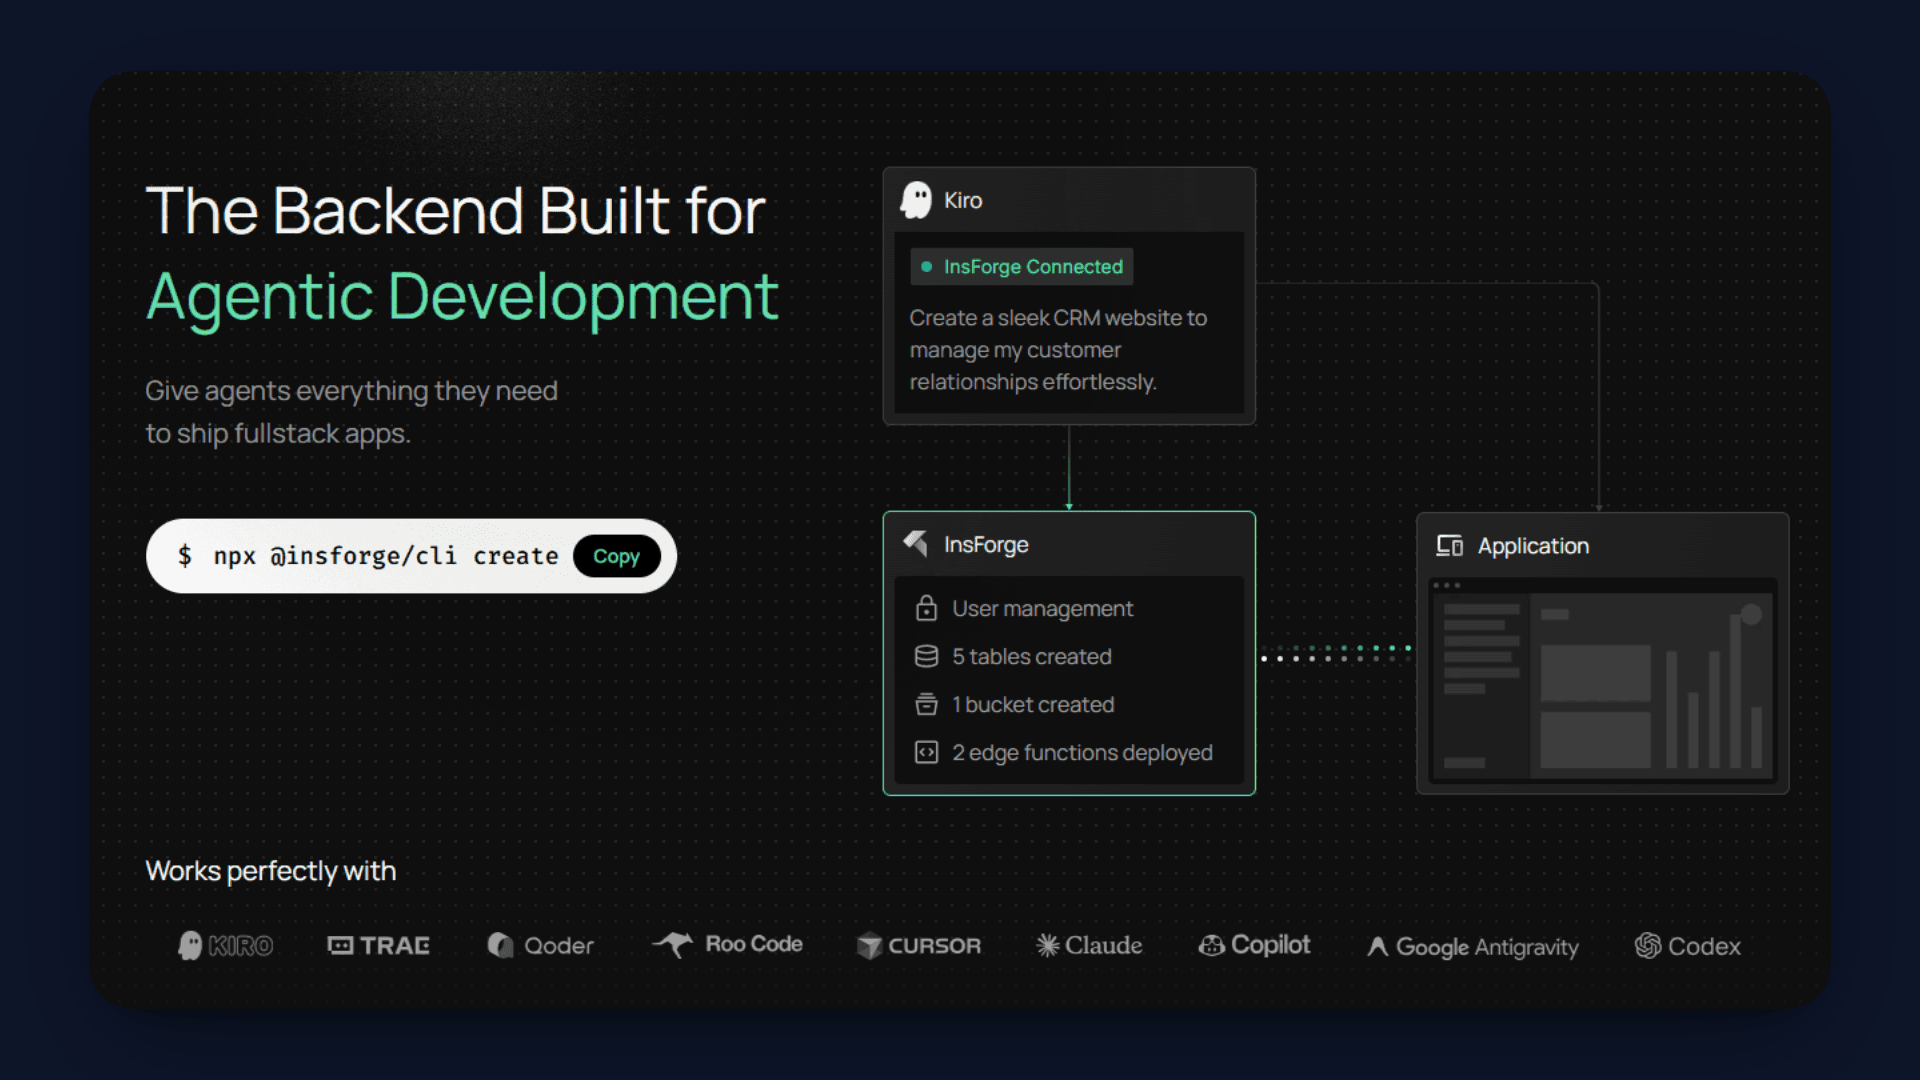
This is where InsForge simplifies the entire process by providing database, storage, edge functions, and AI integration in one platform.
In this article, we will build a complete Multimodal RAG system using Google Gemini Embeddings 2, GPT-4o Mini (via Insforge Model Gateway), and InsForge CLI, step by step, from setup to deployment.
What We Will Be Building
In this article, we will build a Multimodal RAG system with the following flow:
- User uploads:
- Text
- Images
- System:
- Converts all content into vector embeddings
- Stores embeddings in PostgreSQL (pgvector)
- Authentication:
- Users sign in using InsForge Auth
- Each user gets a private, isolated knowledge base
- When a user asks a question:
- Query is converted into an embedding
- Relevant content is retrieved using a similarity search
- AI generates an answer based only on that user’s data
Why InsForge?
Building a Multimodal RAG system usually requires stitching together multiple backend services, which adds complexity and slows down development.
InsForge is a unified backend platform that brings all the required components into one place, allowing you to build and deploy AI applications without managing separate infrastructure.
- : Enables you to store embeddings and perform efficient similarity search directly within a managed PostgreSQL setup.
- : Provides a simple way to upload, store, and retrieve files such as images used in the RAG pipeline.
- : Allows you to write and deploy serverless backend logic for processing embeddings and handling queries.
- : Gives direct access to models like GPT-4o Mini for tasks such as image description and response generation.
- : Lets you host and manage your frontend application without needing a separate hosting service.
- : Handles user management and access control, making it easier to secure your application.
- : Helps manage and orchestrate how different AI models are used within your application.
- : Supports live updates and event-based communication for dynamic user experiences.
What is Insforge CLI?
InsForge CLI is a command-line tool that lets you manage your entire InsForge backend directly from the terminal.
It allows you to configure databases, deploy edge functions, manage storage, set secrets, and handle deployments in a single workflow.
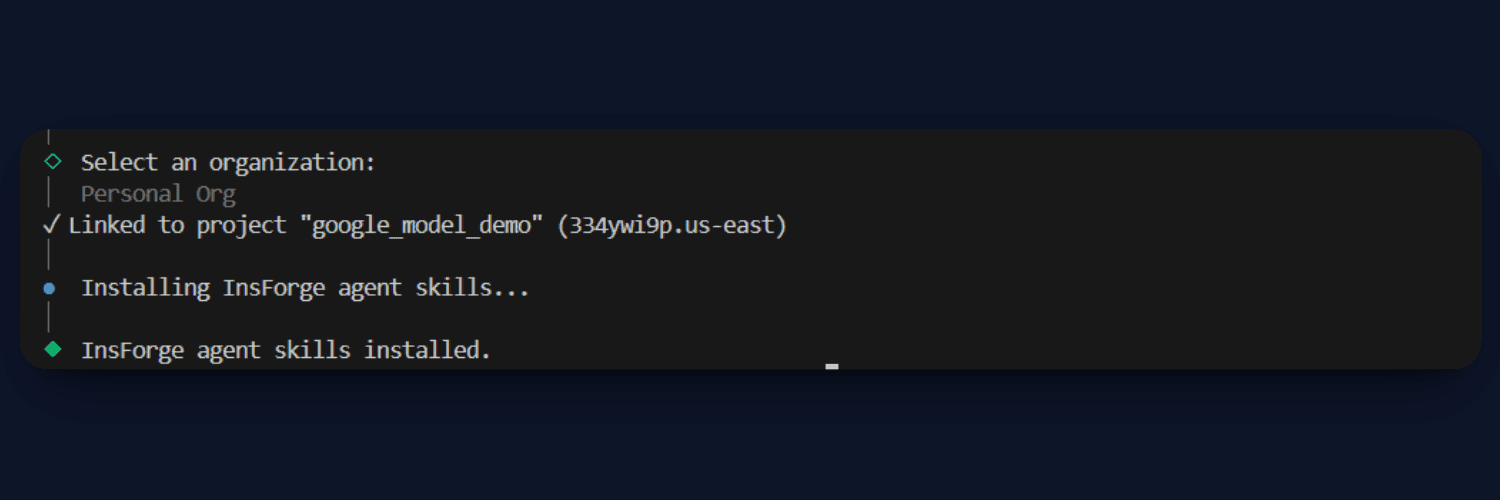
When you create or link a project, it also installs Agent Skills that help AI coding assistants understand and build with your InsForge setup.
Building the Multimodal RAG System
In this section, we will walk through the complete process of building the Multimodal RAG system step by step using InsForge.
From setting up the project to deploying the final application, each part of the pipeline will be implemented and connected end-to-end.
Step 1: Repo Setup
We will start by setting up the project locally. First, clone the repository and install the required dependencies:
git clone https://github.com/Studio1HQ/google_embedding_2-insforge
cd google_embedding_2-insforge
npm install
Once the setup is complete, it is important to understand how the project is structured, because this will help you follow the flow of the system.
The functions/ folder contains the core backend logic of the application. This is where the main RAG pipeline is implemented. The process.ts file is responsible for handling uploads and converting them into embeddings, while query.ts manages the retrieval process and generates answers based on stored data.
The src/ folder contains the frontend built using React and Vite. This handles user interactions such as uploading files and asking questions.
Finally, the api.ts file acts as the bridge between the frontend and backend. It defines how requests are sent to the edge functions for processing and querying.
Step 2: Link to InsForge
Before we start configuring the backend, we need to connect this project to InsForge using the CLI. This step ensures that your local project is linked to an InsForge workspace where all services like database, storage, and functions will be managed.
Start by installing and logging into the CLI:
npm install -g @insforge/cli
insforge login
Once you are authenticated, you can either create a new project or link an existing one:
insforge create
# or
insforge link
After this step, your project will be connected to InsForge. This also automatically installs Agent Skills inside your project, which helps AI coding tools understand your backend setup and generate correct integrations. You can verify your current project context using:
insforge current
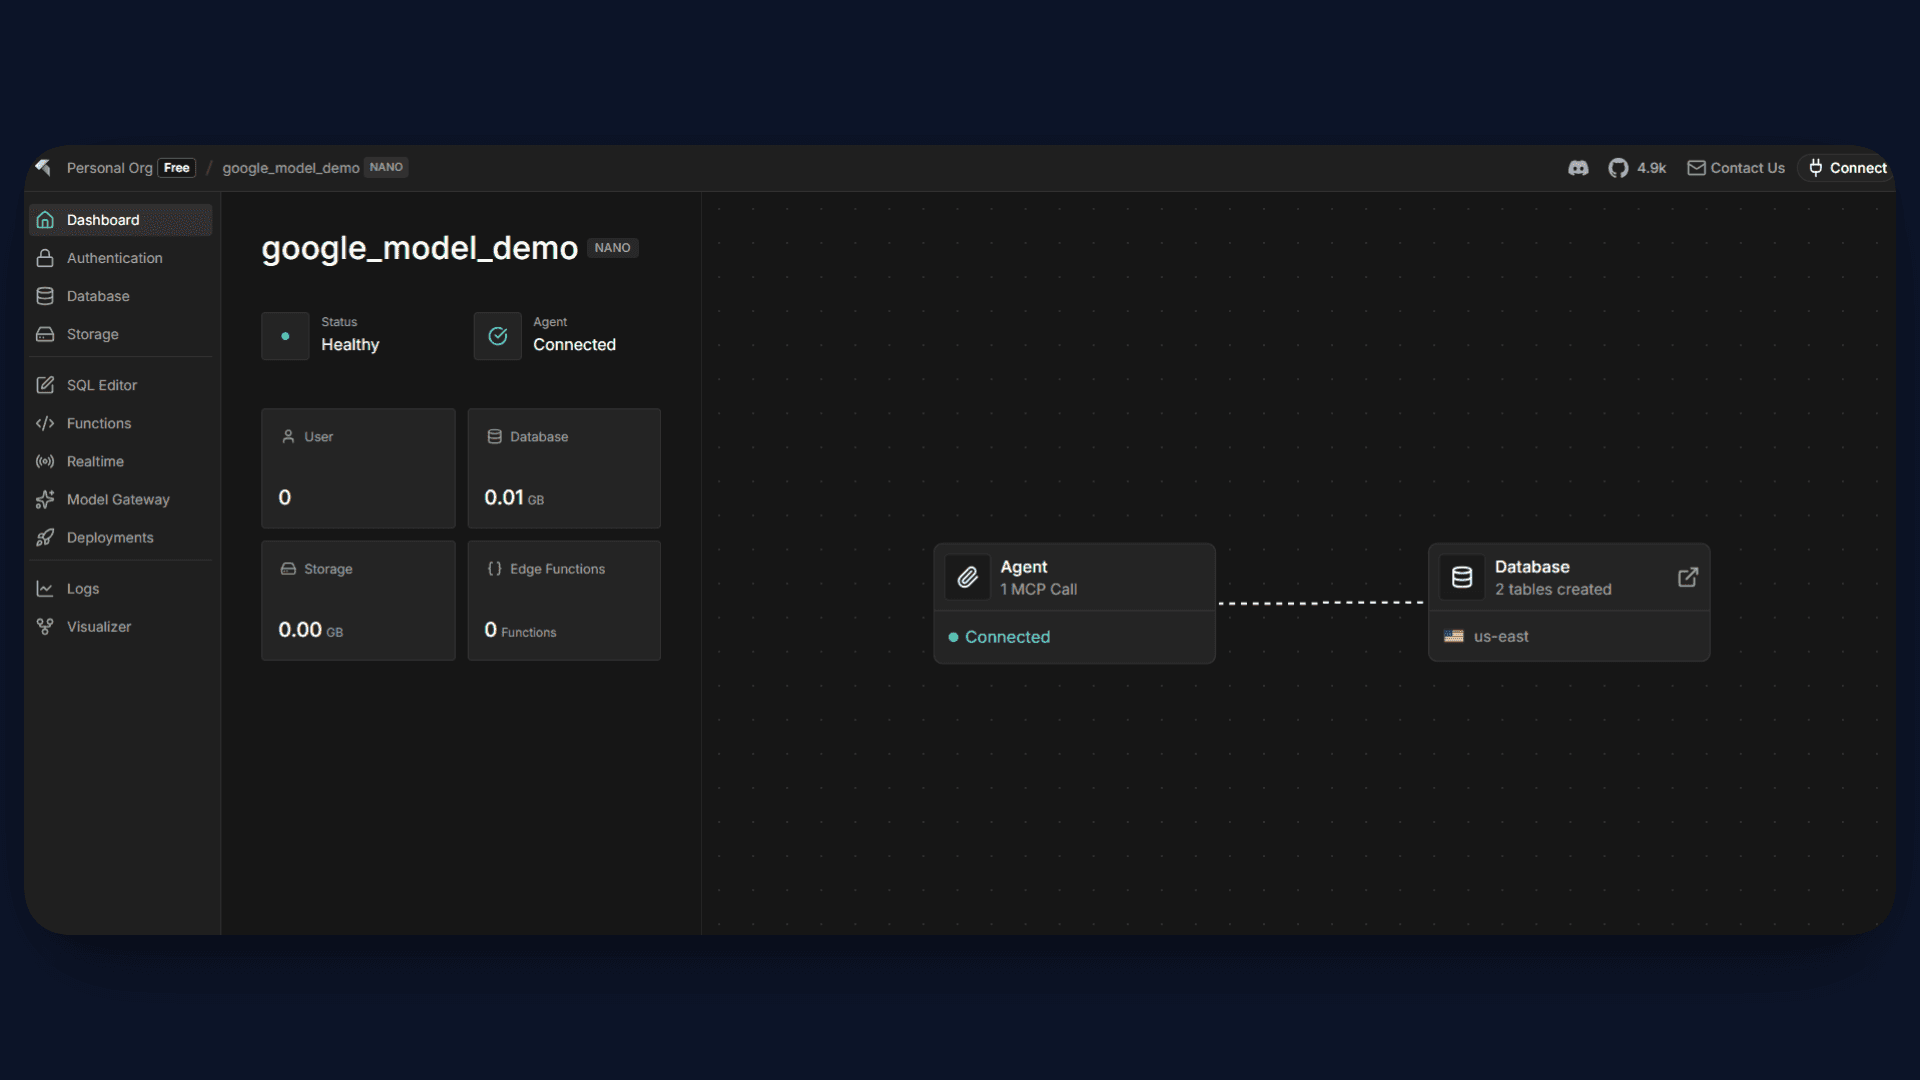
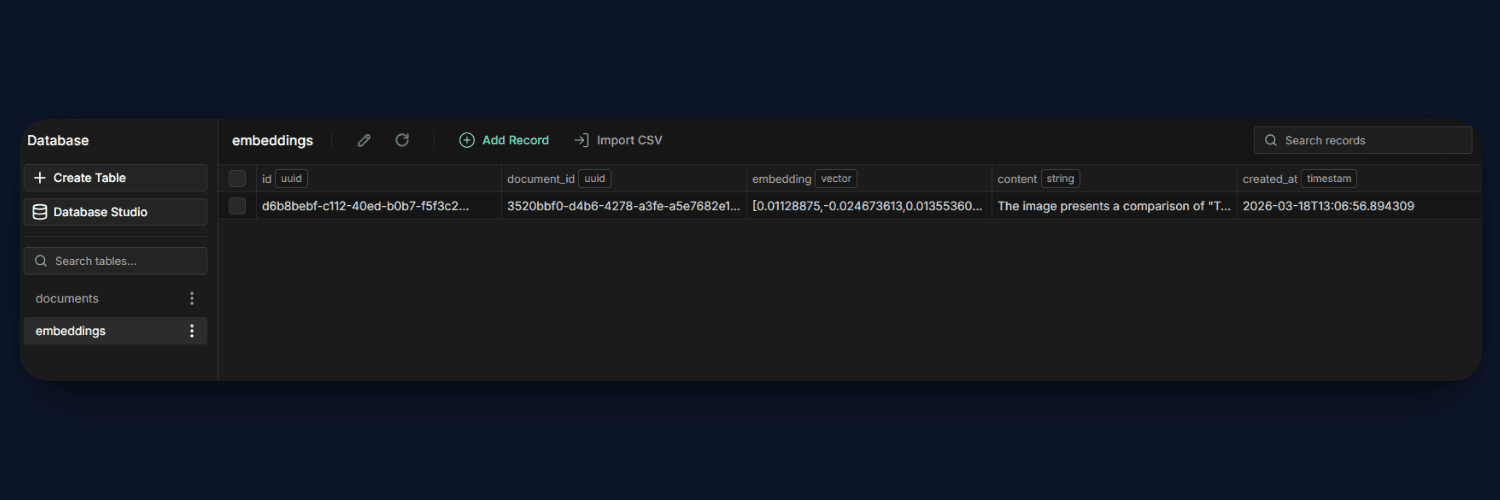
Step 3: Configure Database (pgvector)
Now we will set up the database tables required for our RAG pipeline. We need two things:
- A documents table to track uploaded files
- An embeddings table to store vector representations
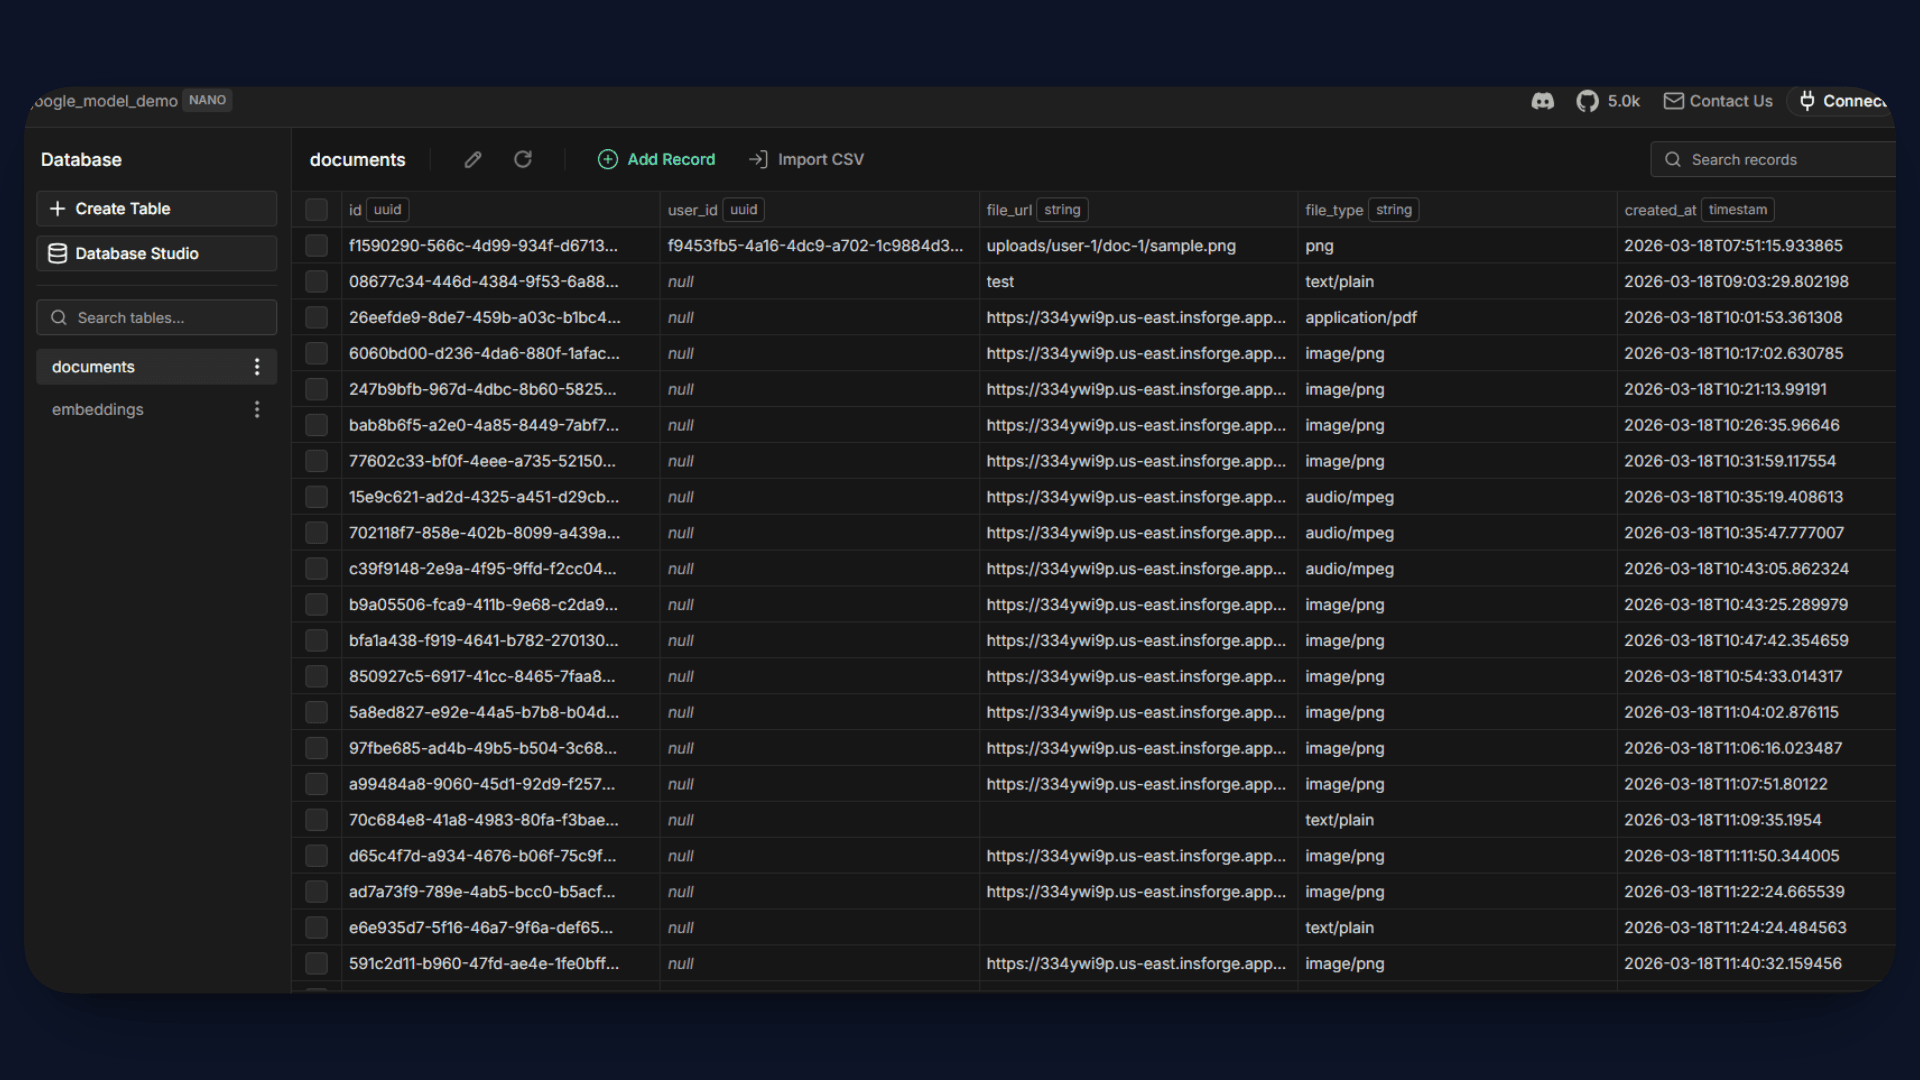
Start by creating the documents table:
insforge db query"
CREATE TABLE documents (
  id UUID PRIMARY KEY DEFAULT gen_random_uuid(),
  user_id UUID,
  file_url TEXT,
  file_type TEXT,
  created_at TIMESTAMP DEFAULT NOW()
);"
This table stores metadata about uploaded content, such as file URL and type.
Next, create the embeddings table:
insforge db query"
CREATE EXTENSION IF NOT EXISTS vector;

CREATE TABLE embeddings (
  id UUID PRIMARY KEY DEFAULT gen_random_uuid(),
  document_id UUID,
  embedding VECTOR(1024),
  content TEXT,
  created_at TIMESTAMP DEFAULT NOW()
);"
This is the most important table in the system. The embedding column stores the vector generated by the Gemini model, while content stores the actual text (or image description). The document_id links each embedding back to its original file.
Once these tables are created, your database is fully ready to support semantic search and power the RAG workflow.
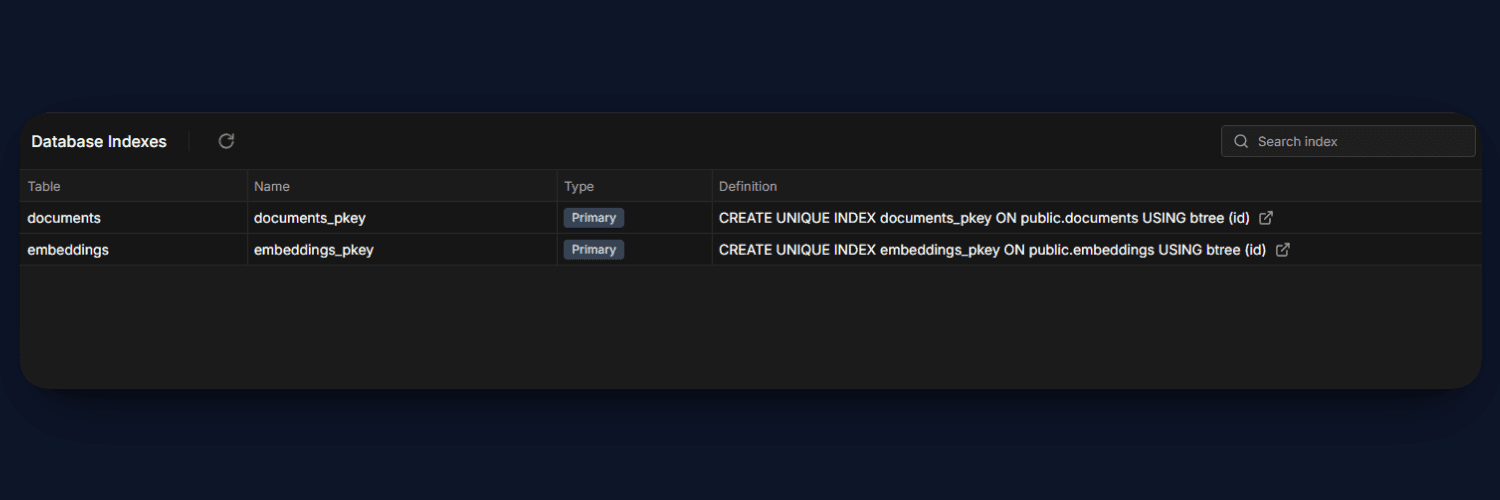
Step 4: Create Similarity Index
Now that our embeddings table is ready, the next step is to optimize it for fast similarity search. Since we will be comparing vectors during query time, indexing becomes very important for performance.
Run the following command to create a cosine similarity index on the embedding column:
insforge db query"
CREATE INDEX ON embeddings
USING ivfflat (embedding vector_cosine_ops)
WITH (lists = 100);"
This index allows PostgreSQL to efficiently search through high-dimensional vectors using cosine similarity. Without this, every query would require scanning the entire table, which becomes slow as data grows.
With the index in place, our system can now retrieve the most relevant results quickly, making the RAG pipeline scalable and responsive.
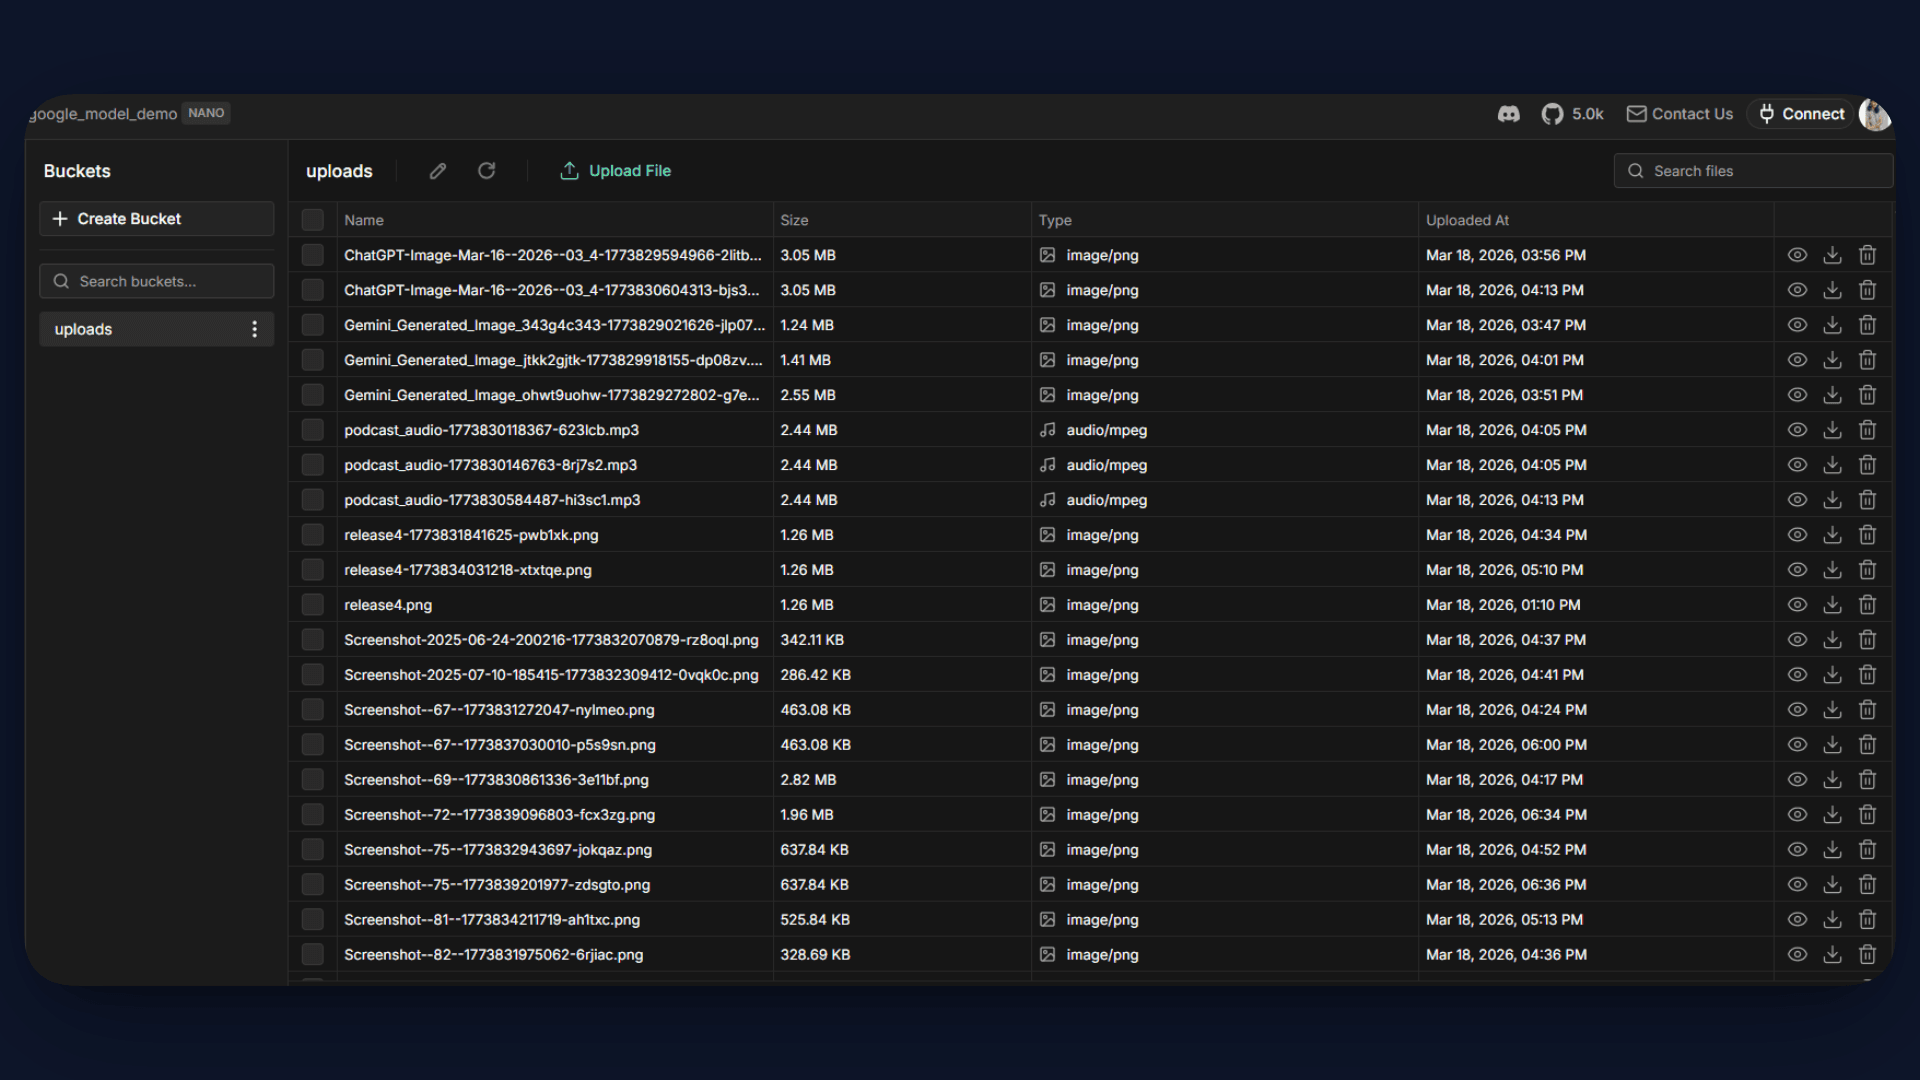
Step 5: Create Storage Bucket
Next, we need a place to store the files that users upload, such as images and documents. For this, we will use InsForge Storage.
Create a bucket named uploads using the CLI:
insforge storage create-bucket uploads
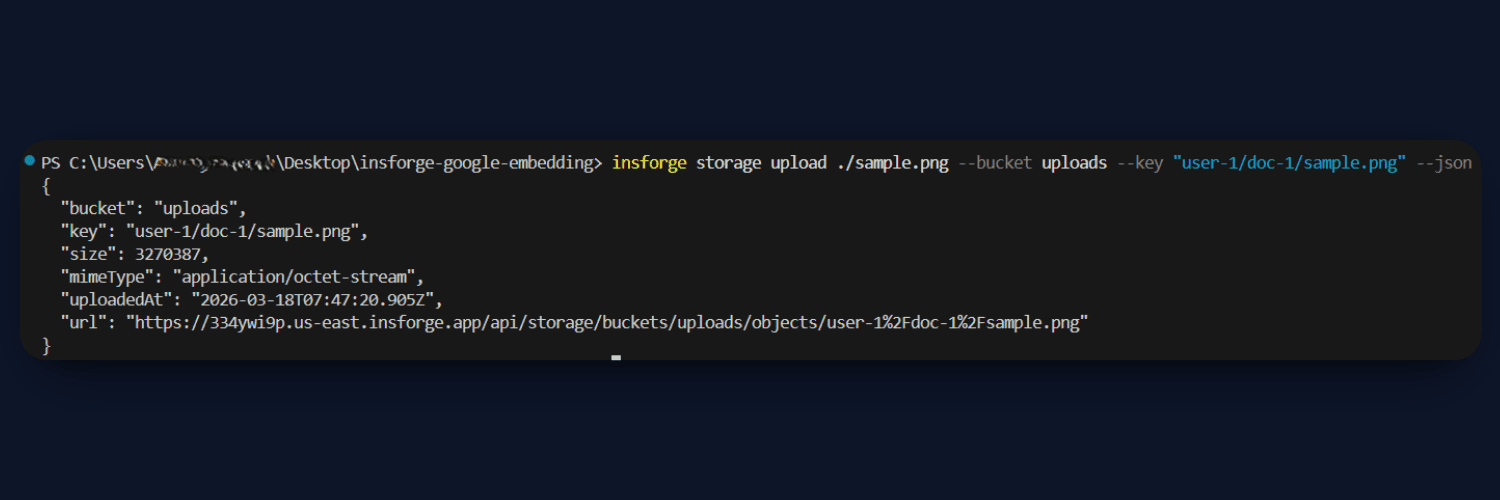
This bucket will be used to store all uploaded files, and each file will be accessible via a URL. These file URLs are later passed to the process function, where the content is fetched, processed, and converted into embeddings.
Step 6: Create Edge Functions
Now we will set up the backend logic using InsForge Edge Functions. These functions handle the core RAG pipeline, processing content and answering queries.
Add Secrets
First, add the required API key for Google and the environment variables:
insforge secrets add GOOGLE_API_KEY your_key
You can also add other required keys like API_KEY and INSFORGE_BASE_URL similarly.
Deploy Functions
Deploy the two main functions from the functions/ folder:
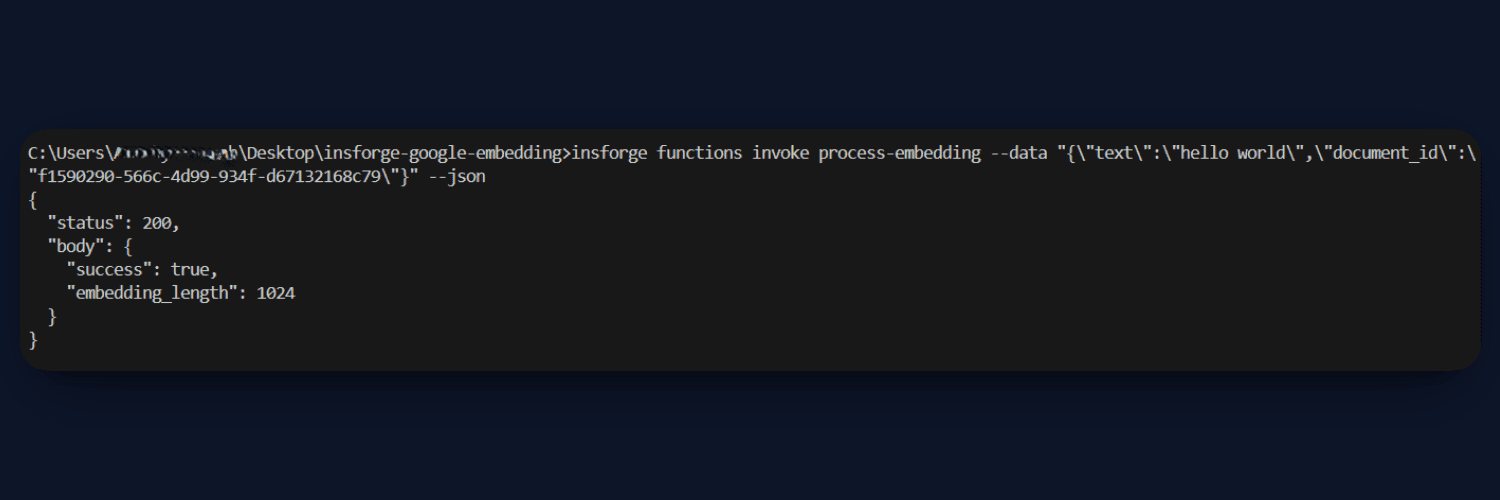
insforge functions deploy process-embedding --file ./functions/process.ts
insforge functions deploy query-embedding --file ./functions/query.ts
process.ts: This function handles embedding creation. It accepts text or files, processes them, and converts the content into embeddings using the Gemini model. For images, it generates a text description using GPT-4o Mini before embedding. Finally, the embedding and content are stored in the database.
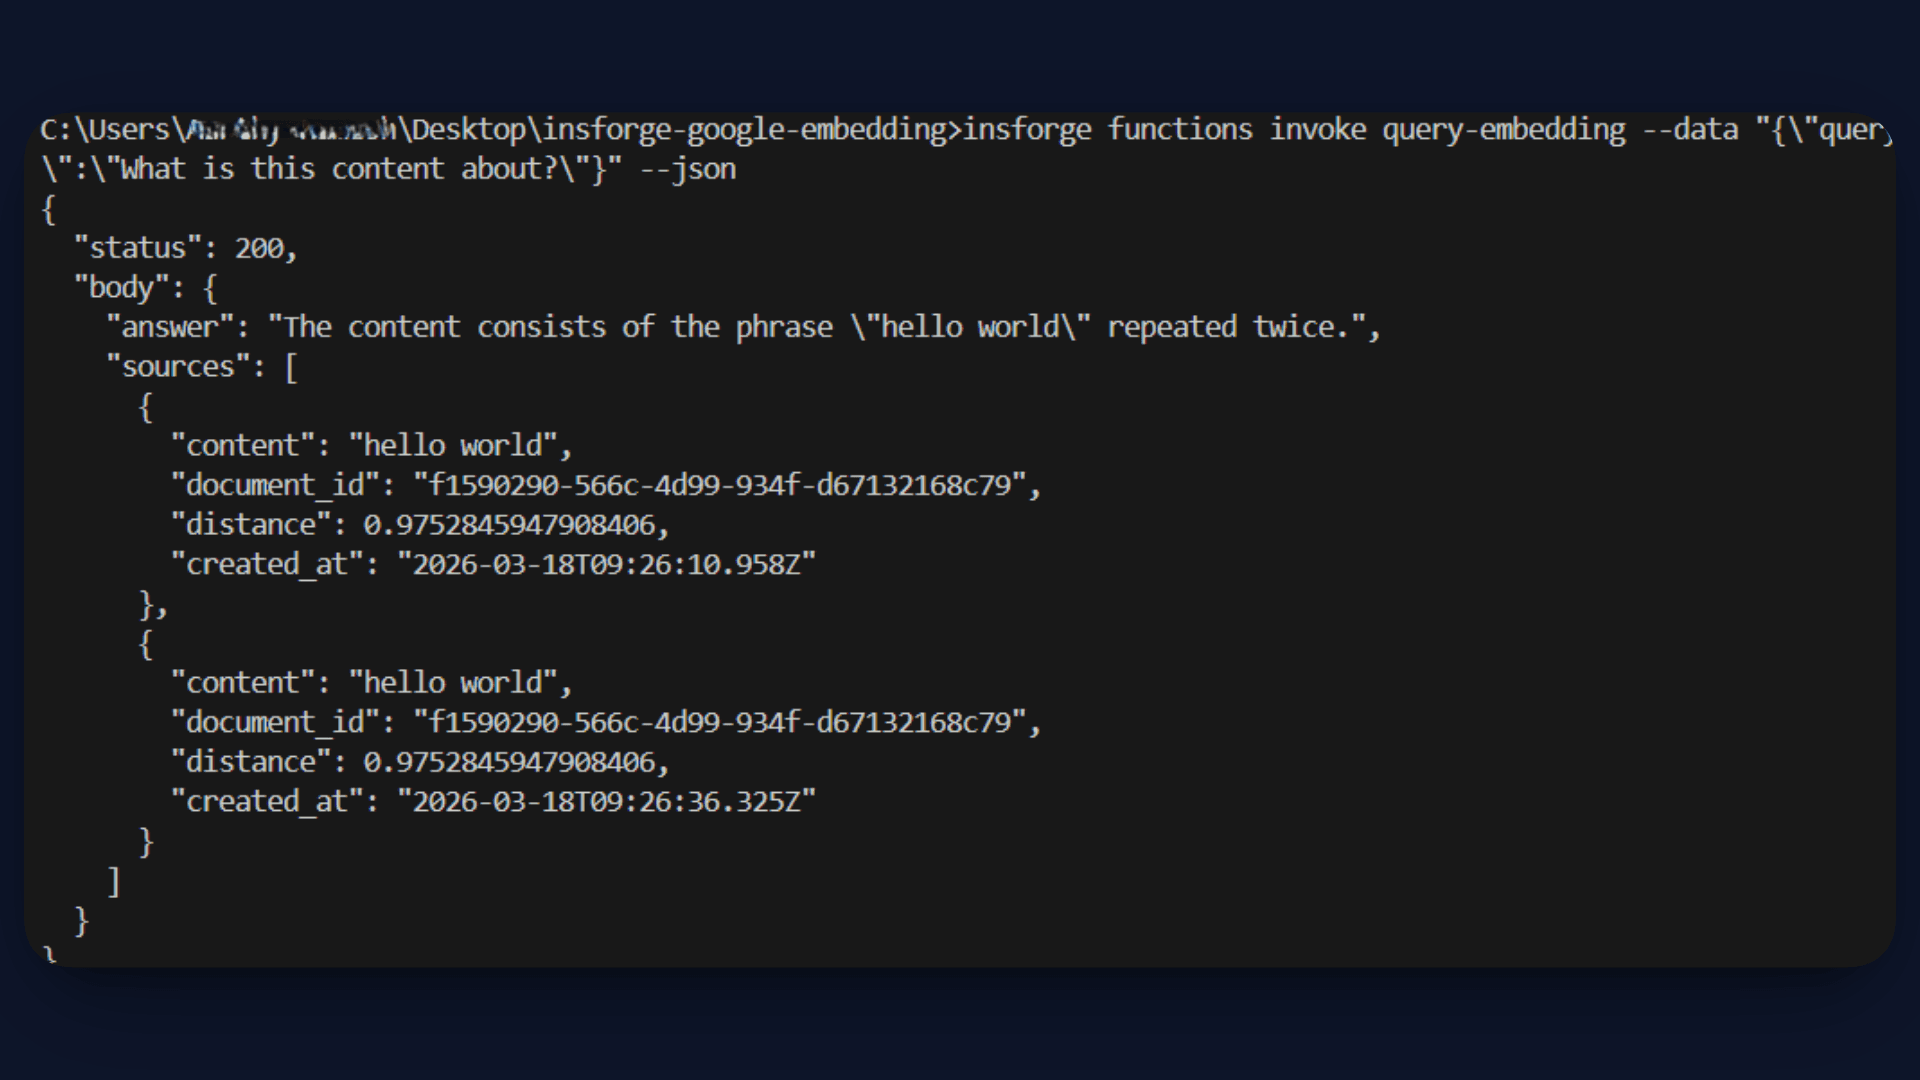
query.ts: This function handles the RAG pipeline. It converts the user query into an embedding, performs a similarity search in the database, and retrieves the most relevant results. These results are passed as context to GPT-4o Mini, which generates the final answer.
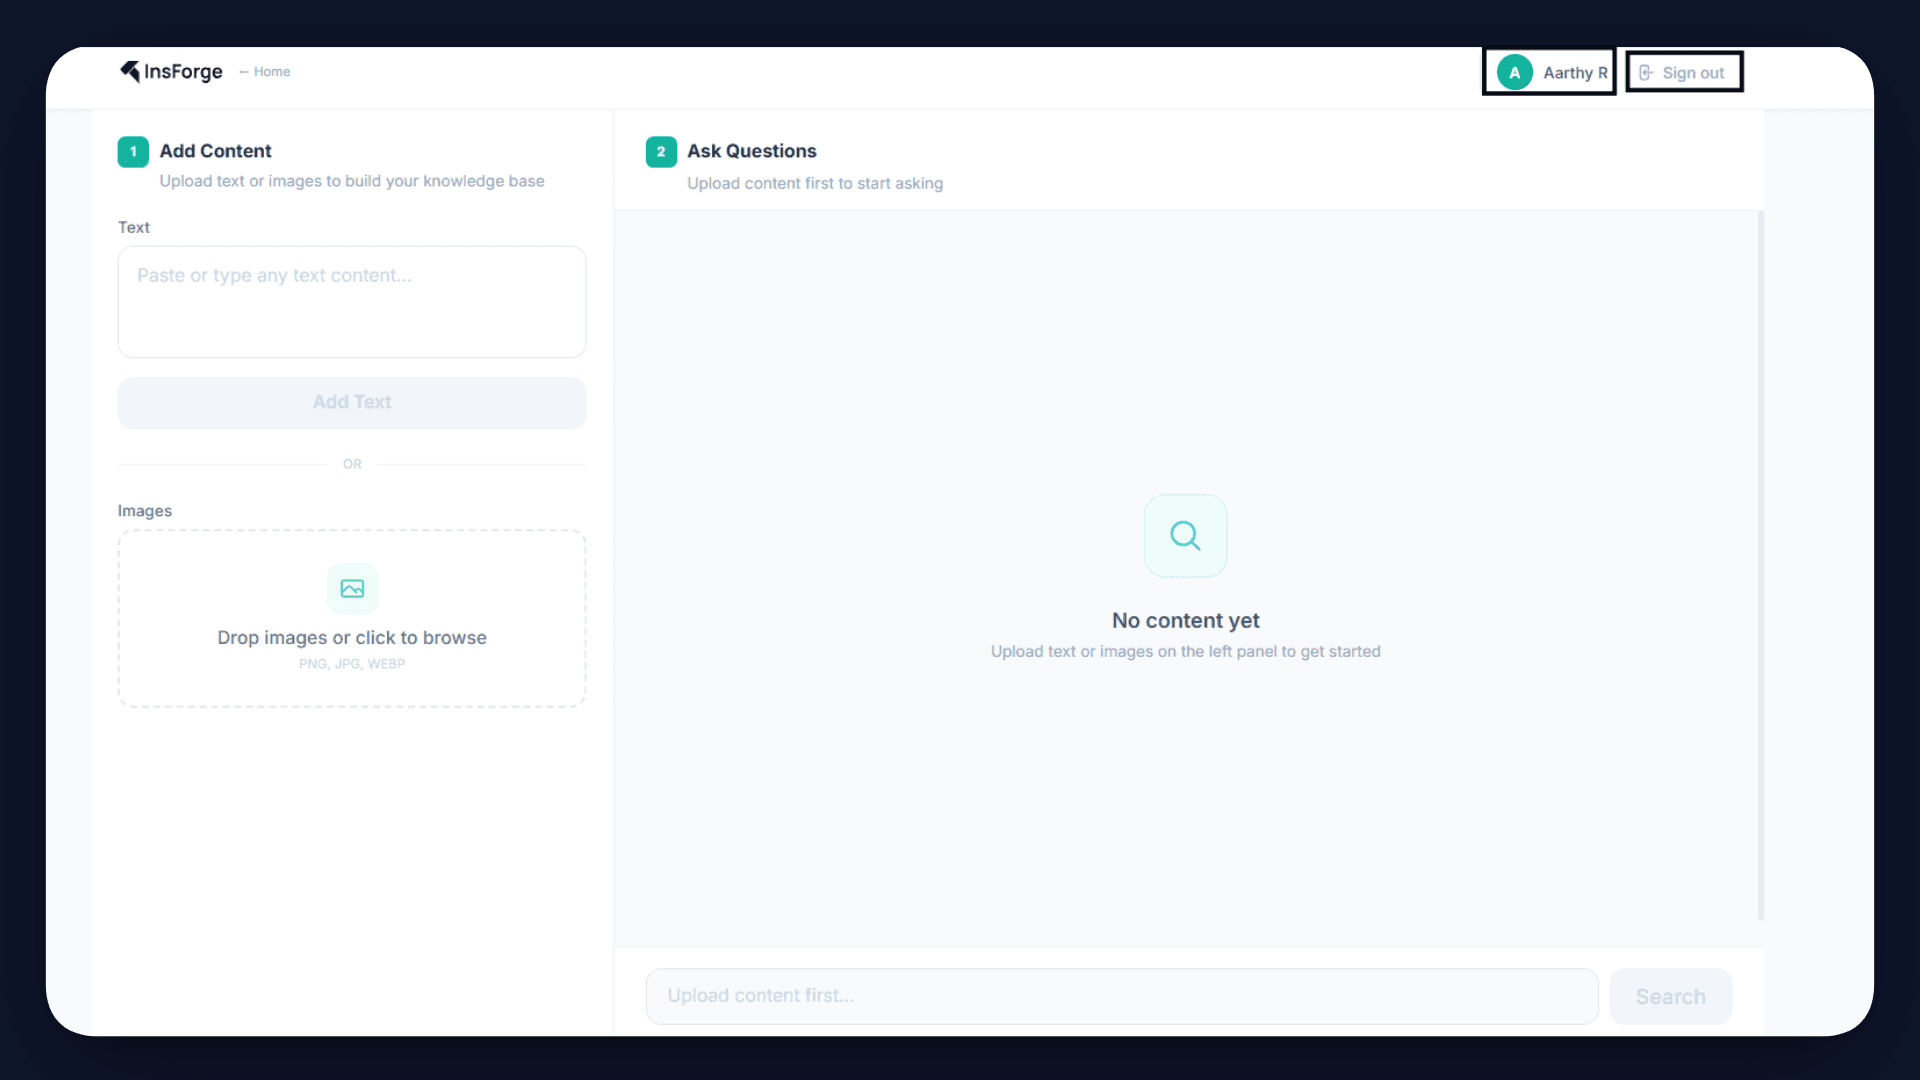
Step 7: Create Frontend
With the backend in place, the next step is to connect it to the frontend. The frontend in this project is built using React and communicates with the backend through the api.ts file.
The api.ts file acts as a bridge between the UI and the InsForge services. It handles all API calls for uploading files, creating records, processing embeddings, and querying results.
Upload Flow
When a user uploads a file, the following sequence happens:
- The file is uploaded to InsForge Storage
- A document record is created in the database
- The
process-embeddingfunction is triggered to generate and store embeddings
Query Flow
When a user asks a question:
- The query is sent to the
query-embeddingfunction - The function retrieves relevant content using a similarity search
- A final answer is generated and returned to the frontend
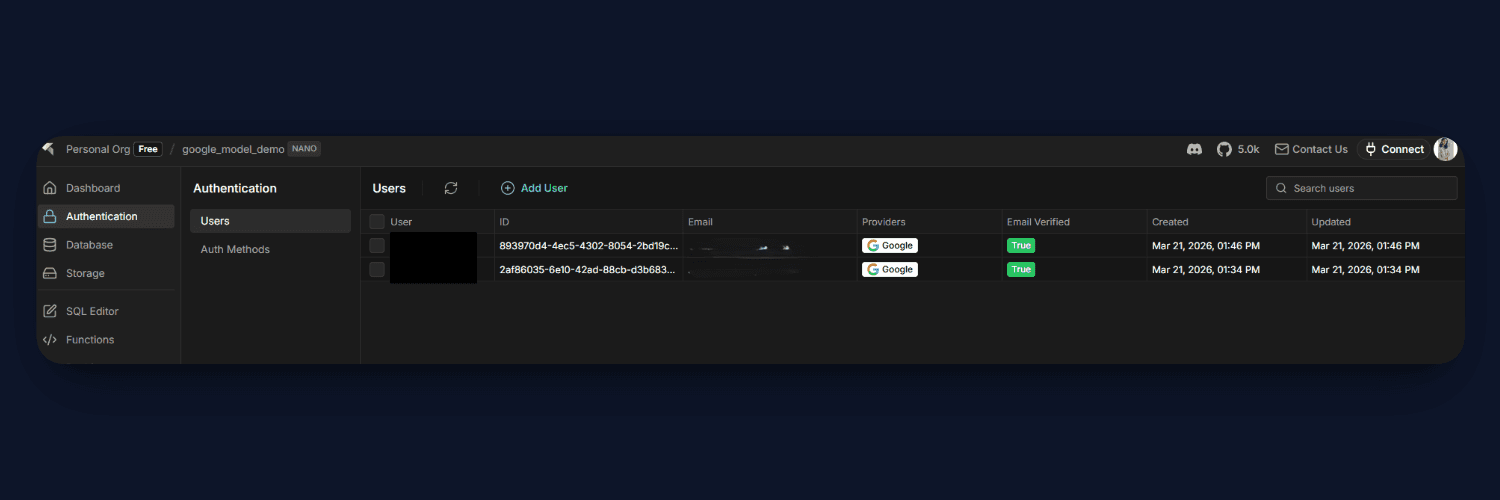
Step 8: Add Authentication
To ensure that each user has their own private knowledge base, we integrate InsForge Authentication into the application.
InsForge handles the entire authentication flow through a hosted UI. When a user signs in, they are redirected to an InsForge auth page, and upon successful login, a JWT token is issued and stored securely. This token is then used in all API requests to identify the user.
The implementation is handled across a few key files:
- In
src/main.tsx, the app is wrapped withInsforgeProvider, which initializes authentication state and restores sessions - In
src/components/LandingPage.tsx,SignInButtonandSignUpButtontrigger the hosted authentication flow - In
src/App.tsx, hooks likeuseAuth()anduseUser()manage session state and expose user details - In
src/api.ts, the access token is attached to every request using theAuthorizationheader - In
functions/query.ts, the token is decoded to extractuser_id, and queries are scoped to that user
This enables data isolation across the system. The frontend only works with the current user’s session, the edge functions filter data based on the user ID, and the database enforces strict access control using Row Level Security.
Step 9: Deploy the App
Once everything is set up, the final step is to deploy your application. InsForge makes this straightforward by handling both the backend and frontend deployment in a single command.
Run the following command from your project directory:
insforge deployments deploy
This will build and deploy your frontend, while connecting it to the configured backend services like database, storage, and edge functions.
If your frontend requires environment variables (such as the API URL), you can pass them during deployment:
insforge deployments deploy --env'{"VITE_API_URL":"your_url"}'
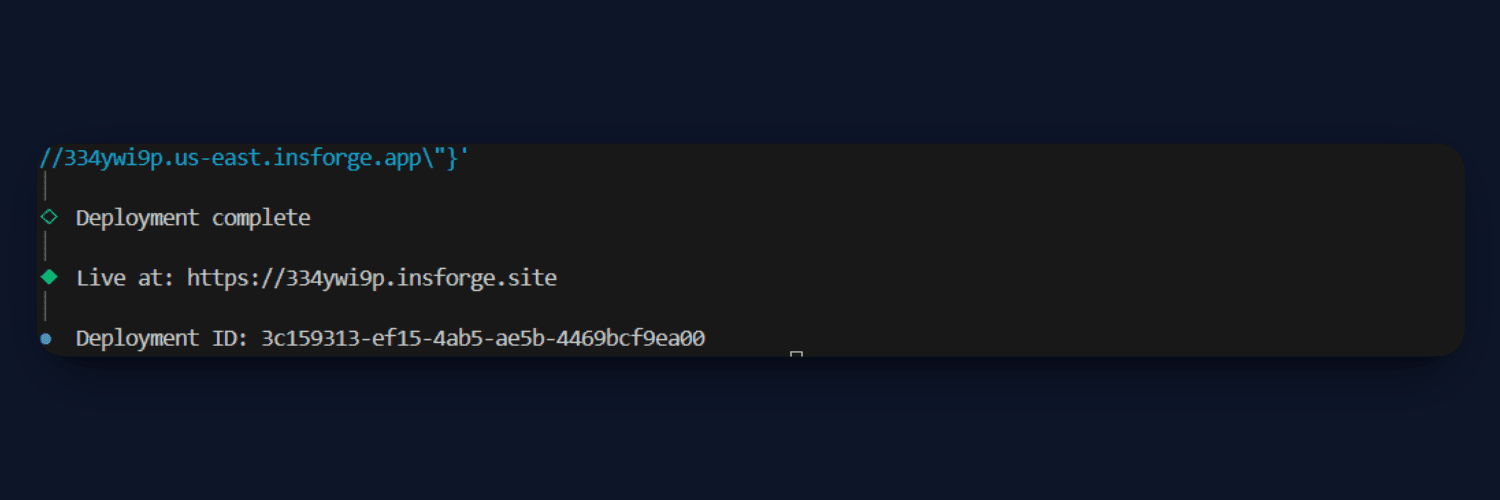
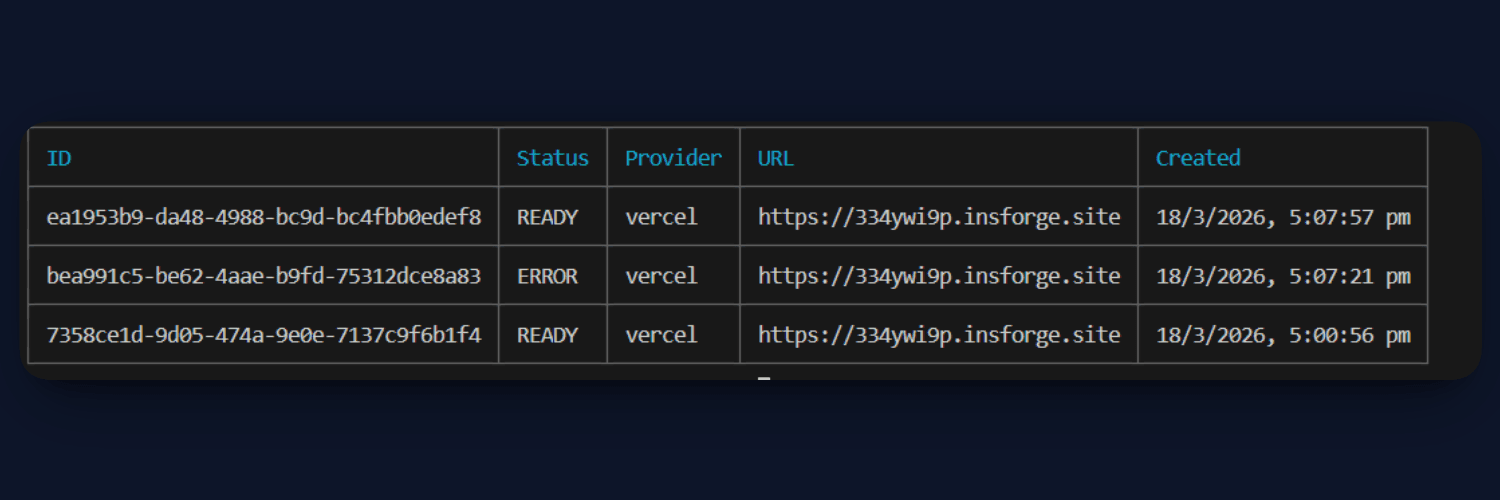
After deployment, your application will be live and accessible via a public URL, completing the end-to-end setup of your Multimodal RAG system.
App Live link - https://334ywi9p.insforge.site/
Results
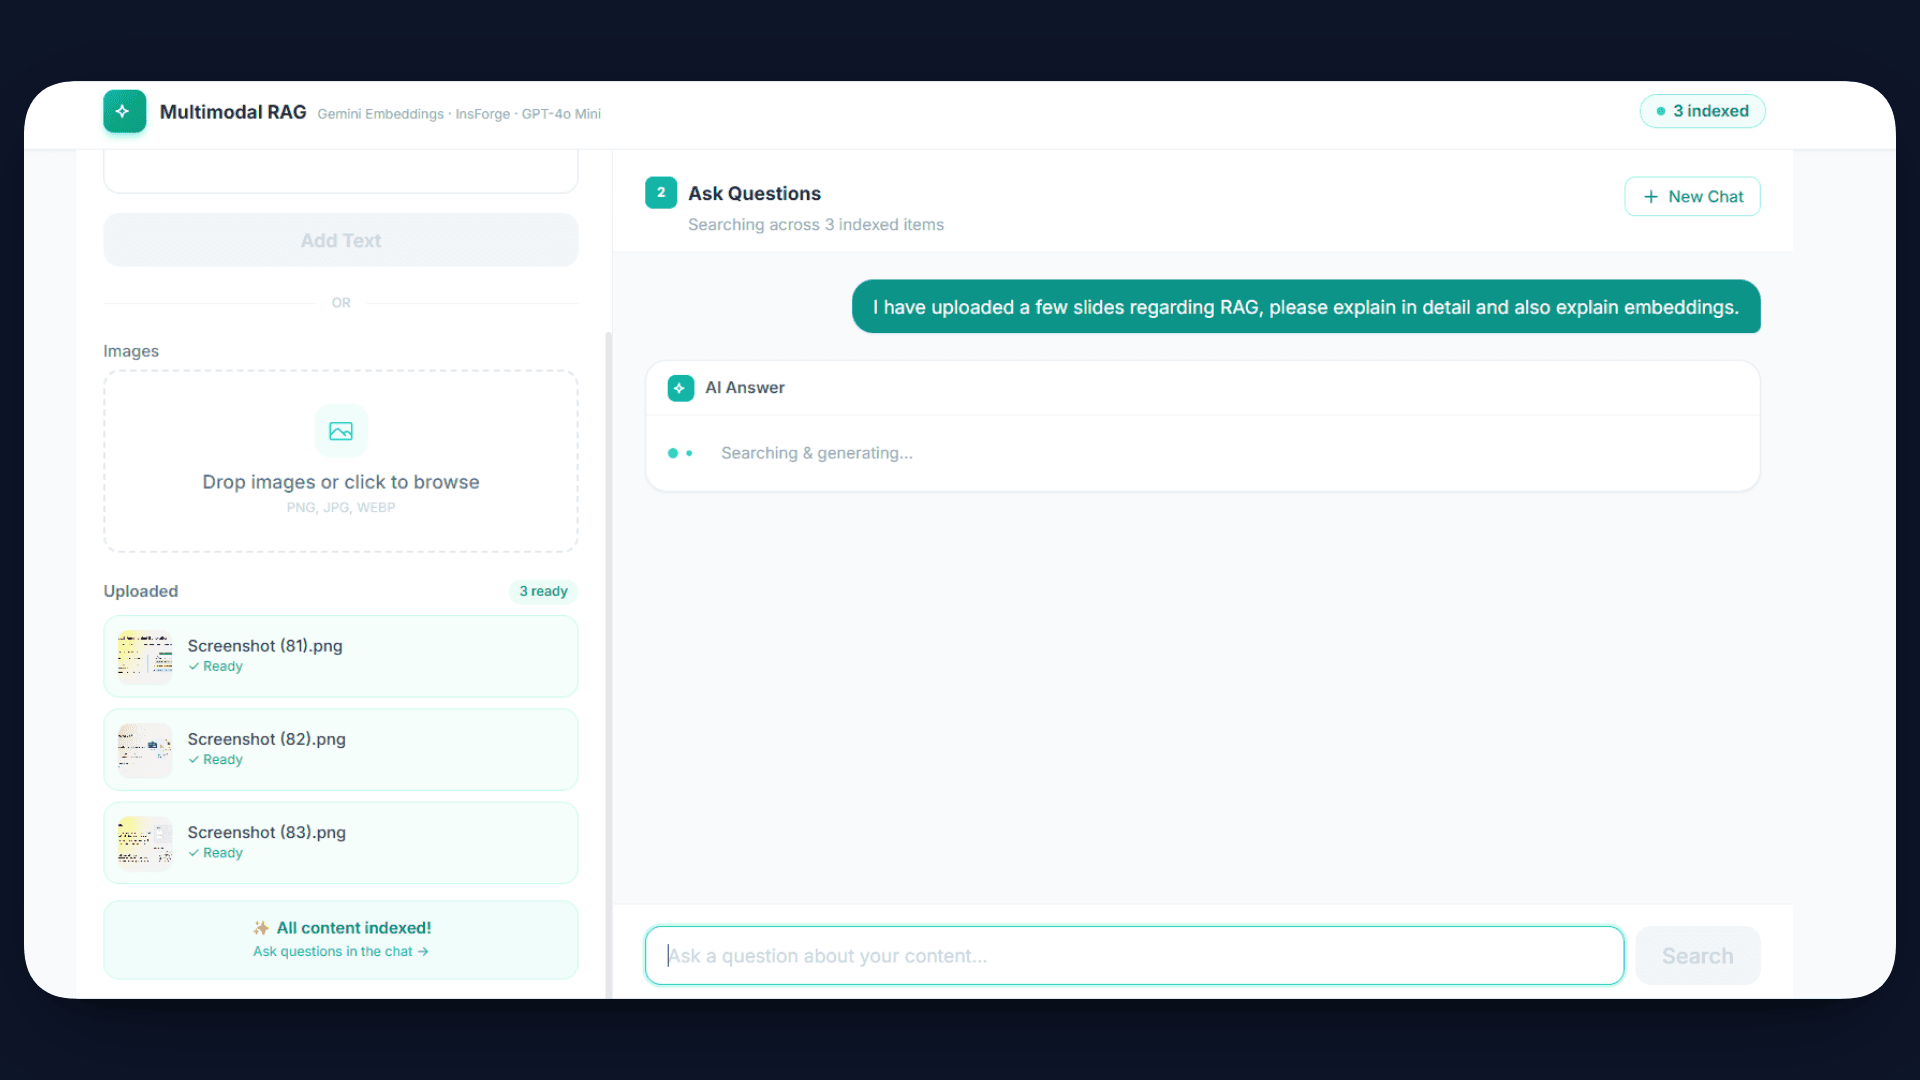
At this stage, your Multimodal RAG system is fully functional and ready to use.
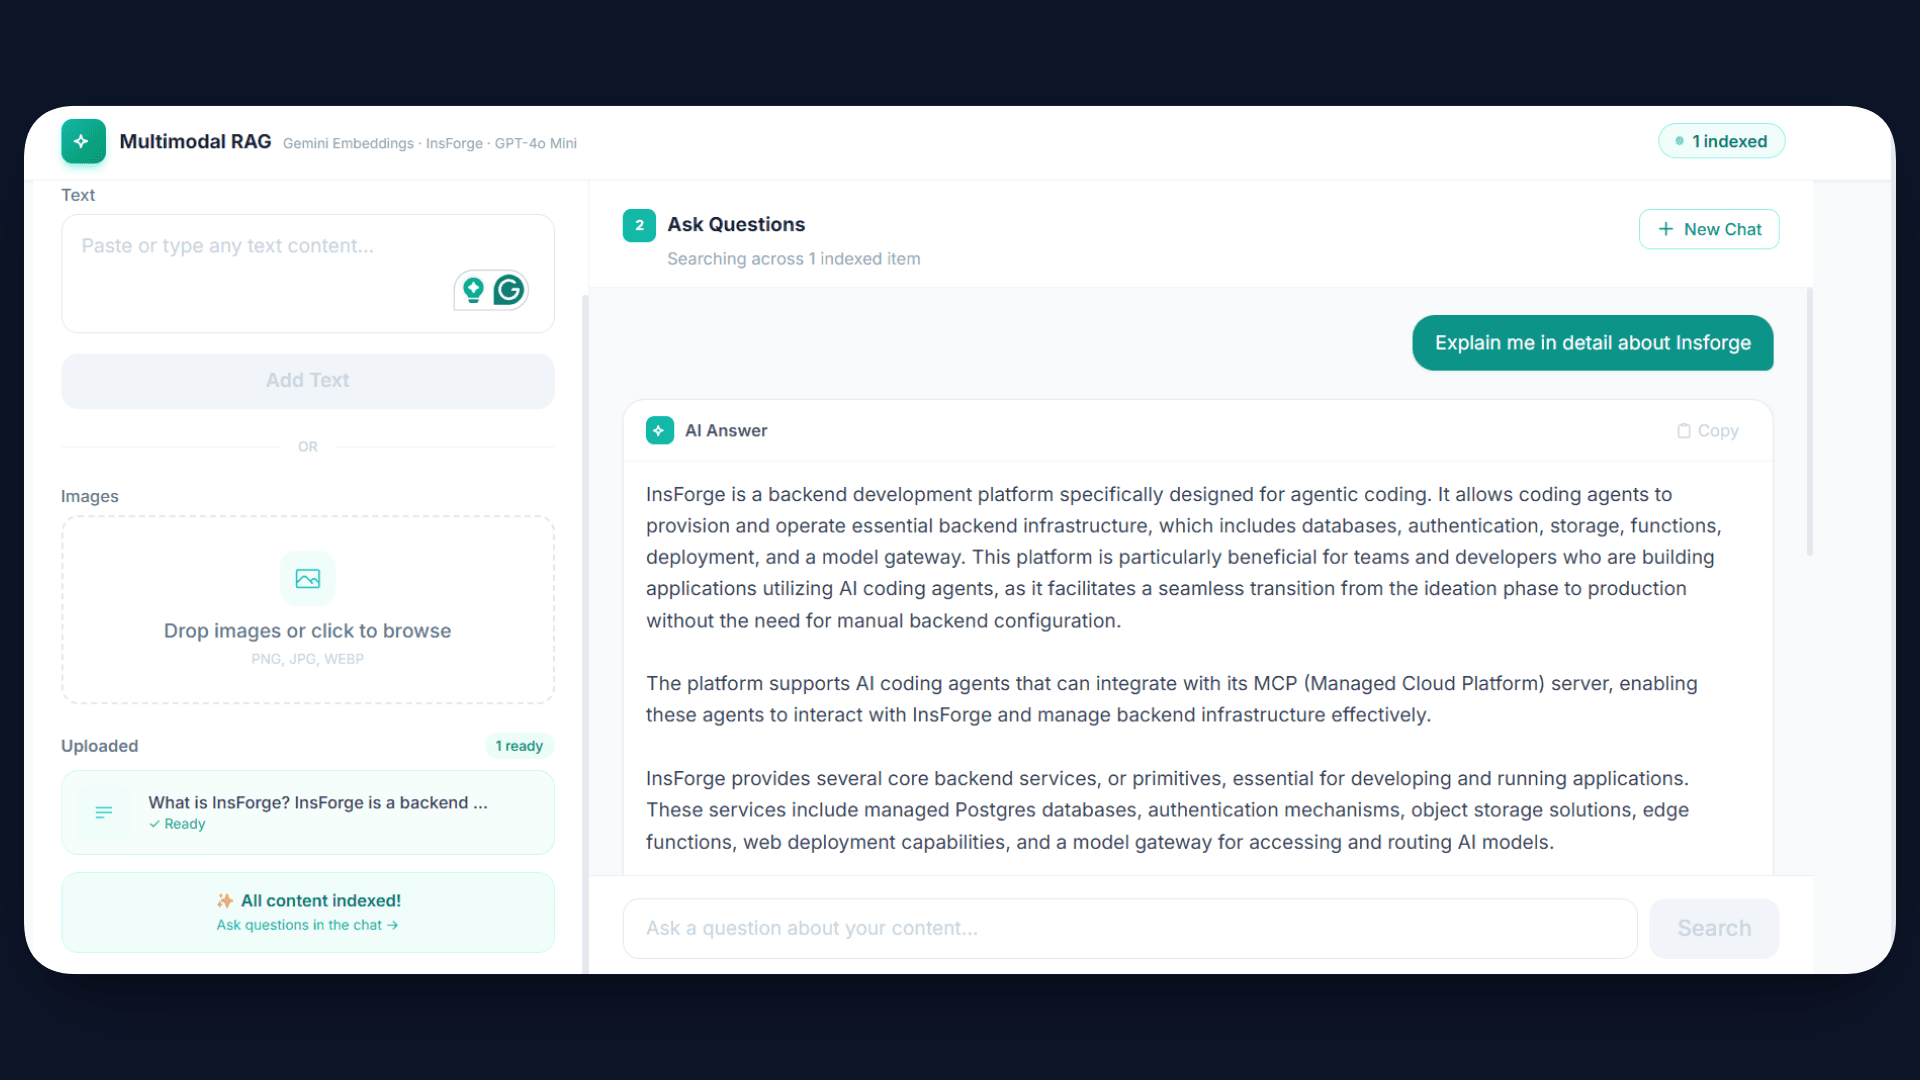
Once the application is live, users can upload text or images through the interface. The system automatically processes this content, generates embeddings, and stores it in the database. This indexing happens in the background, so the data becomes searchable immediately.
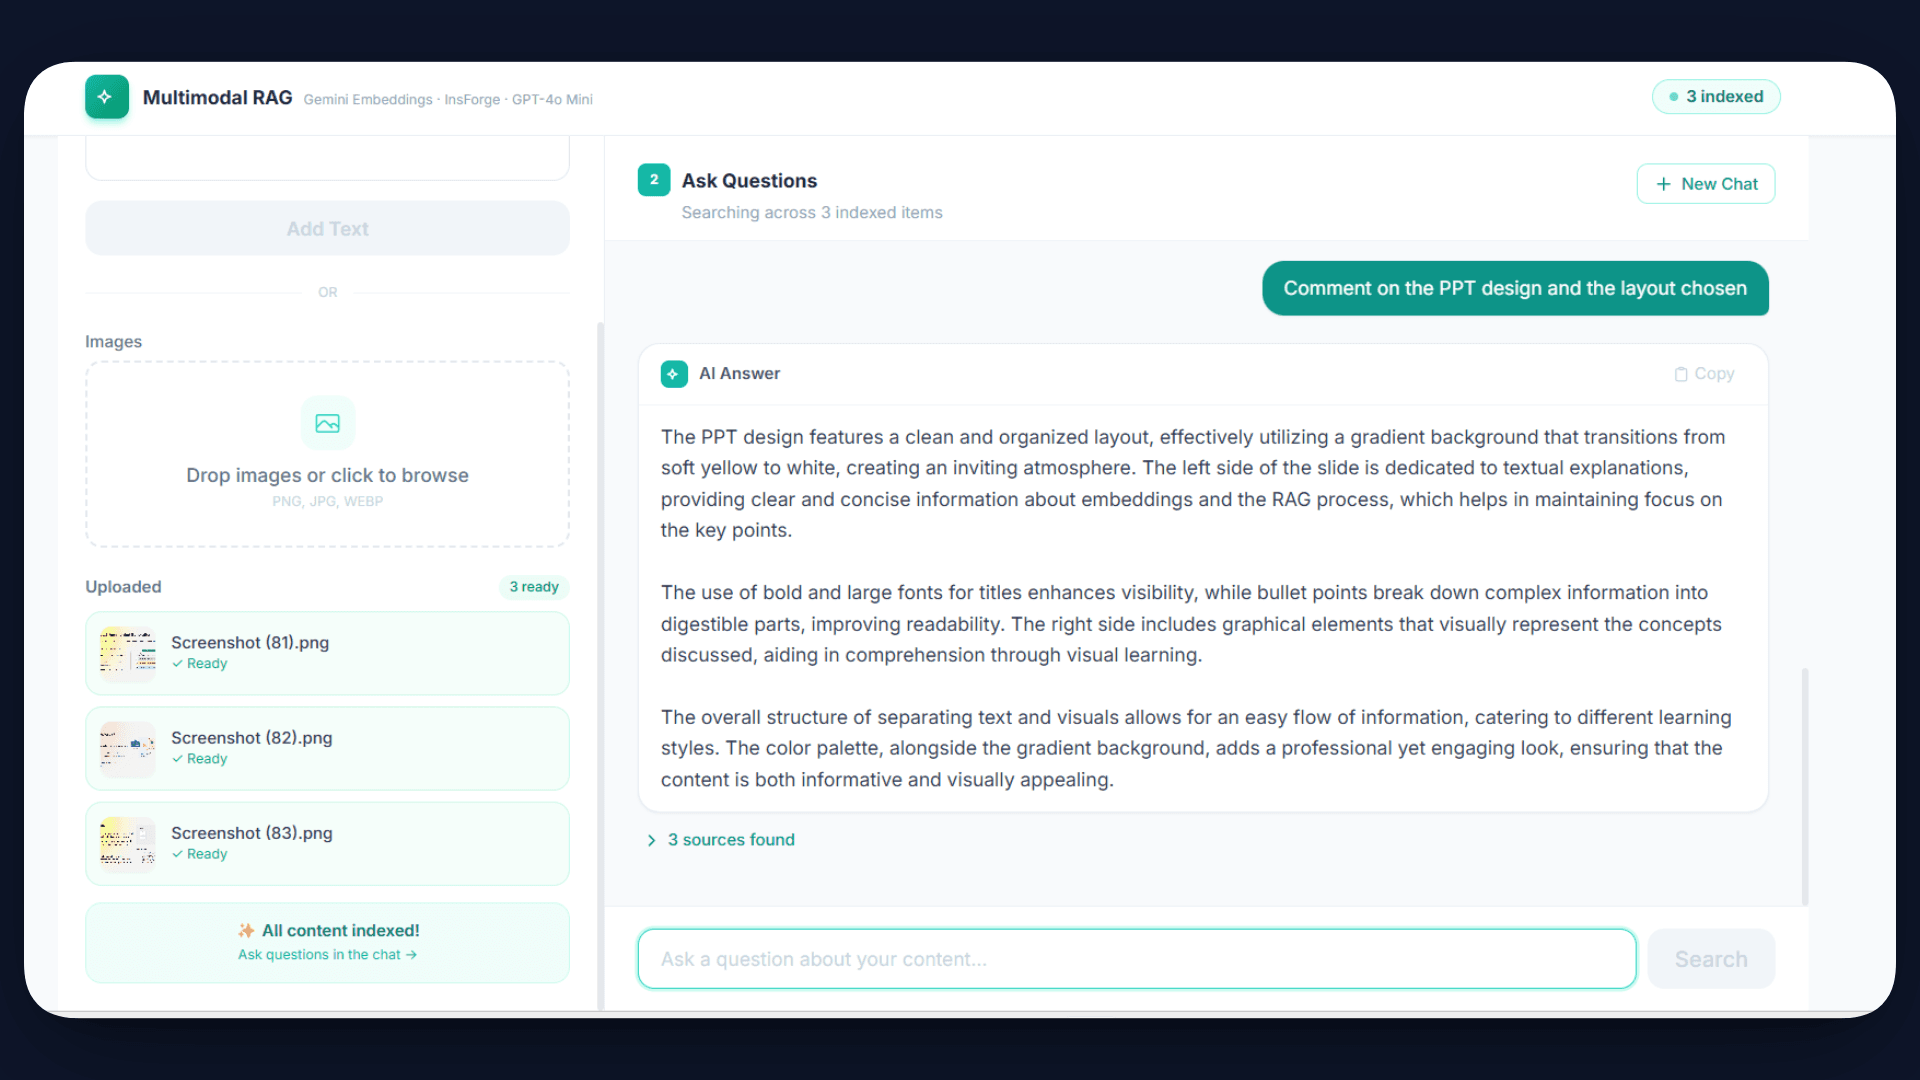
Now, when a user asks a question such as “What is shown in the uploaded image?”, the system converts the query into an embedding, retrieves the most relevant content using similarity search, and passes it to the AI model.
Final Notes
Multimodal RAG allows applications to understand and query both text and images in a unified way. Gemini embeddings convert all types of content into vectors, and pgvector enables efficient similarity search over this data. The retrieved context is then used by GPT-4o Mini to generate accurate and grounded responses.
With InsForge, the entire pipeline, including backend, storage, AI integration, and deployment, is handled in a single platform, making the overall development process much simpler.
If you are building AI applications and want to avoid managing multiple services, InsForge provides everything you need in one place. You can get started using the CLI, set up your backend quickly, and build end-to-end AI systems without additional complexity.
To learn more about InsForge, check out the GitHub repo.